A base template for deploying Rails applications.
The following versions are very important to keep in mind. We've done this because we think that the Ruby, Rails and ORM type and versions are the ones that apply the most constraints to a starter template.
-
Ruby 2.2.0
-
Rails 4.2.2
-
Mongoid 4.0.2
Also this template uses Zeus which preloads your Rails app so that your normal development tasks such as console, server, generate, and specs/tests take less than one second.
You can configure Zeus' settings using the zeus.json file located in your Rails root path.
Note: We are not using Spring. If you would like to disable all possible problems by using Spring and Zeus at the same time, consider setting the DISABLE_SPRING=true environment variable (place in your .bashrc or .zshrc file).
Installing zeus (this template was tested with zeus v0.15.4)
$ gem install zeus -v 0.15.4Copy the example files
  $ cp config/mongoid.yml.example config/mongoid.yml
  $ cp config/secrets.yml.example config/secrets.yml
  $ cp .env.example .env
Running Zeus
$ zeus startRunning Server
$ zeus serverRunning Specs
$ zeus rspec spec- Set the SECRET_KEY_BASE environment variable (you can generate this using the
rake secret, it will output a generated token for you, just copy/paste)
heroku config:set SECRET_KEY_BASE=a25...2cefa- Install the Mongoid addon (we’ve selected the free option - MongoLab)
heroku addons:create mongolab:sandbox- Uncomment the heroku deployment hack located at the end of the
config/application.rbfile
####Brakeman (GITHUB REPO) Brakeman is a static analysis tool which checks Ruby on Rails applications for security vulnerabilities.
usage
brakeman -o output_fileCheck the gem's README and instructions on how it reports vulnerabilities (and how to fix them).
SecureHeaders (GITHUB REPO)
Security related headers all in one gem, you can find the config file in config/initializers/security_headers.rb, The security rules have been loaded on ApplicationController class using the ensure_security_headers class method.
The gem will automatically apply several headers that are related to security. This includes:
- Prevents your content from being framed and potentially clickjacked
- Prevent content type sniffing
- Helps prevent attacks based on MIME-type confusion.
- Cross site scripting heuristic filter for IE/Chrome
- Prevent file downloads opening
- Restrict Adobe Flash Player's access to data
Is a security feature that lets a web site tell browsers that it should only be communicated with using HTTPS, instead of using HTTP (it forces you to do things the right way on production).
Browser compatibility:
- IE: 11
- Chrome: > 4
- Firefox: > 4
- Opera: 12
- Safari: 7
Optional: Learn more about HTTP Strict Transport Security here: https://goo.gl/ldjc5h
Is an added layer of security that helps to detect and mitigate certain types of attacks, including Cross Site Scripting (XSS) and data injection attacks. These attacks are used for everything from data theft to site defacement or distribution of malware.
Browser compatibility:
- IE: Edge
- Chrome: > 25
- Firefox: > 24
- Opera: 15
- Safari: 7
Optional: Learn more about Content Security Policy here: https://goo.gl/u23dit | https://goo.gl/wHC9C5 | https://goo.gl/Z8UvAz
The Public Key Pinning Extension for HTTP (HPKP) is a security feature that tells a web client to associate a specific cryptographic public key with a certain web server to prevent MITM attacks with forged certificates.
Browser compatibility:
- IE: ?
- Chrome: > 38
- Firefox: > 35
- Opera: ?
- Safari: ?
Server Compatibility
-
NGINX: adding the following line and inserting the appropriate pin-sha256="..." values will enable HPKP on your nginx. This requires the
ngx_http_headers_moduleto be installed on your nginx installation (it should be installed by default, as it is a standard nginx module). See more details for this module here: http://nginx.org/en/docs/http/ngx_http_headers_module.html. -
Apache: adding a line similar to the following to your web server's config will enable HPKP on your Apache. This requires the
mod_headersmodule enabled.
Important Note: If you enable the HPKP feature, you MUST enable the server side modules for this too, because if not, you will not be able to connect to the server.
Optional: learn more about the details of HPKP here: https://goo.gl/yrx3ex | http://goo.gl/zFnaaW
We are using a combined strategy between secrets and dotenv approaches, you can use a similar approach like Figaro, in fact after almost two years there is still some discussion about what is the best approach for managing your settings and sensitive information (there is an interesting post from Figaro's creator here).
Finally, these are our conclusions about the selected approach:
-
Always gitignore your config files (at least those that do not contain heteromorphic or sensitive data - but it would be an odd case) [heteromorphic in this context: configuration settings that don't change depending on the environment, possibly application configuration runtime settings].
-
It is great that our settings can be managed through a "rich object", it gives us a convenient way for controlling and structuring our information using a set-based approach.
-
In order to be compliant with the config section in the twelve factor app methodology, we can also use environment variables (ENV) whenever necessary.
config/secrets.ymlas other YAML files in Rails is passed first through ERB, this behaviour gives us the chance to set our ENV usingdotenvwhich allows us to load environment variables from an.envfile into ENV in the configured environment. -
Keeping an easy deployment is a priority, and it is clear that using an ENV approach seems to cover this concern, but you can obtain the benefits of an hybrid solution by using a rich object support and ENV approach. Our experience has taught us that the sensitive data and the external integration credentials is a real concern for both the staging and production environments (especially for scenarios with limited control as Heroku), however you can manage this responsibility with ease, in your own servers you always can use capistrano (or similar solutions) for automating the remote installation of the
secrets.ymlfile in each application server. On the other hand, you can also configure your application so that it’s compliant with Heroku. This template does not come bundled with capistrano or anything so you can choose what to do, but we recommend that you stick with the "Store config in the environment" premise on 12factor.
To configure this template for a standard Heroku deployment, you just have to add/uncomment a little deployment hack that you can see at the end of config/application.rb file (remember that the secrets.yml file is gitignored) in order to copy the example files that come with environment variable fetching inside of them via erb.
-
One of the most important things in our context is ‘convention over configuration’, and secrets is the default approach (and convention) for managing sensitive information in the Rails community (although we really think a better name would be "app_config").
-
Secure defaults, the new convention has agreed that the
secret_key_base(used to verify the integrity of signed cookies) will be stored in the secrets file, you can see more info here and here
Dotenv (GITHUB REPO)
You can use this integration for configuring your environment variables in the app environment you desire. For now the template has an .env.example in which you can establish a common structure for your ENVs, then you can integrate this declarations into the secrets file using an ERB definition: secret_cat_key: <%= ENV["SECRET_CAT_KEY"] %>, this way both a file or ENV approach can be used, whichever you select.
This template follows the RSpec rules mentioned on the RSpec upgrading documentation, in that sense we have two config files:
-
spec_helper: this file provides an out-of-the-box way to avoid loading Rails for those specs that do not require it. We are using the--require spec_helperoption inside the.rspecfile by establishing a non-Rails configuration by default. -
rails_helper: this file provides a configuration space for specs which do depend on Rails (in a Rails project, most or all of them).rails_helper.rb..rspecfile requiresspec_helper.rbby default, for that reasonrails_helper.rbdoes not need to require tospec_helper.rbby itself. You can change the default setting to use--require rails_helper.rbin your.rspecfile if you wish.
If you wonder yourself what happens when you run zeus rspec then we have tested that it will load your rails_helper.rb file just once. This way when you run your tests you won't have to wait for the rails_helper.rb file to be loaded each time. Take into account that zeus sometimes does not reload changes in the pre-forked files, so it is better for you to restart zeus whenever you have made changes to the spec_helper.rb or rails_helper.rb files to be sure.
Also, according to the current configuration you don’t need to add any metadata information manually, take into account that newer versions of Rspec ( > 3.0.0) do not do it unless you explicitly specify it, you can find this config line in the rails_helper.rb file: config.infer_spec_type_from_file_location!. Be aware on how your files are structured, you can find a good explanation on to organize spec files here: here.
Capybara & Poltergeist (GITHUB REPO)
Poltergeist is our chosen driver for Capybara. It allows you to run your Capybara tests on a headless WebKit browser, provided by PhantomJS. We are using this driver in favor of capybara-webkit and selenium.
Selenium is a good tool for enabling automation of web browsers, it applies for automated testing too but it is much slower than capybara-webkit and poltergeist, since it fires up a whole Firefox browser instance.
Compared to capybara-webkit we can find that poltergeist has the following advantages:
-
Sometimes, in capybara-webkit what you see is NOT what you get (perhaps on the interacting scenarios), we have had some problems when we use some dynamic graphical interactions (animations, fade-out, fade-in, etc), some of them have been impossible to testing or in the good case for building our tests we have had to make some unpleasant tricks.
-
Poltergeist has much clearer error messages, its debugging and inspection system is so much better, you can easily see if a HTML element is overlapping with another (avoiding to execute some action or event on it) or track your javascript errors.
-
The installation process is easier, even on Linux you can find stable binary releases for PhantomJS.
-
The screenshot feature is more flexible (i.e. customizable).
-
You can inspect network traffic.
-
You have a richer API to trigger native events (e.g. typed keys, mouse, etc) on a specific HTML element.
element.native.send_key(:Enter) # triggers Enter keyAt the end, you can customize several options for deploying Poltergeist changing the way how Capybara executes your test suite.
We recommend that you always try to use version managers for everything you can, such as phantomenv. for PhantomJS.
you can find an stable release here:
- PhantomJS 1.9.7 (tested on Ubuntu 12.04)
you can choose the edge (2015-07-02):
- PhantomJS 2.0.0 (tested on Ubuntu 12.04)
- PhantomJS 2.0.0 for linux 14.04 and 15.04 (not tested)
you can see the complete discussion here
- You can install it using brew
brew install phantomjs - If you want to be in the edge you can install from here
- If you are using Boxen, you can try (NOT TESTED) this module.
No, close this window...seriously?... sorry for you.
Test coverage is provided by the simplecov gem, however this integration has some problems with Zeus but we have already dealt with them in this template. You can find more info here and here, also you can manipulate the way how things are loaded by modifying the custom_plan.rb file located in your Rails root path, as we mentioned earlier.
Similarly, at the beginning of the rails_helper.rb file we have configured simplecov to work without zeus too. Finally we can find all the coverage in the coverage/ folder which is gitignored by default and is updated once the tests have finished running.
We have complemented our test suite with some basic stuff we always use like:
-
VCR records your test suite's HTTP interactions and replay them during future test runs for fast, deterministic, accurate tests. There is an example spec in the
spec/features/welcome_spec.rbfor you to copy from (because we have bad memory), also you can see more info here -
Faker A library for generating fake data such as names, addresses, and phone numbers.
-
Factory Girl factory_girl is a fixtures replacement with a straightforward definition syntax, support for multiple build strategies (saved instances, unsaved instances, attribute hashes, and stubbed objects), and support for multiple factories for the same class (user, admin_user, and so on), including factory inheritance.
We have integrated five (5) powerful gems for checking code quality.
Rubocop (GITHUB REPO)
A Ruby static code analyzer, based on the community Ruby style guide. You can execute this code inspection process by using the $ rubocop --format html -o tmp/rubocop.html command, it will generate a new file tmp/rubocop.html in which you can see your “offenses” inside your code. Also, you can find the config rubocop file in .rubocop.yml.
Rubycritic (GITHUB REPO)
RubyCritic is a gem that wraps around static analysis gems such as Reek, Flay and Flog to provide a quality report of your Ruby code. You can execute this code inspection process by using the $ rubycritic app command, it will generate a HTML file set for the code quality report, you can find this in tmp/rubycritic/overview.html.
Rails Best Practices (GITHUB REPO)
It is a code metric tool to check the quality of Rails code. It is a little old fashioned but it could help you with some metrics that are not visible to the others analysers (Rubocop, Rubycritic).
Inch (GITHUB REPO)
A documentation measurement tool for Ruby, based on YARD. you can generate several documentation reports for your code documentation, execute this code inspection by using the $ inch command, however you can also use other options like: $ inch stats $ inch lists $ inch suggest for obtaining a most complete information. You can see a quick 'getting started' guide here.
Bullet (GITHUB REPO)
Bullet helps you to kill N+1 queries and unused eager loading, it will run each time that you execute any request on your web server, you can see either a javascript alert (you can also disable it) or a little report in the logs (or both of them) when a new related issue is found. You can find the config block in the config/environment/development.rb file.
We are using Guard for automating the inspection of code changes. Guard is a command line tool to easily handle events on file system modifications. We have integrated Guard with Inch, Rubycritic and Rubocop. If you want to execute this process you can run the $ guard command in the root project path.
If you do not want have a process for monitoring and doing this stuff all the time for you, you can run $ rake code_quality:check for running Rubycritic, Rail Best Practices, Inch and Rubocop inspections all at once whenever you want.
Improving our application’s performance is a very important thing, in the previous section (CODE QUALITY) we have included the Bullet gem, you can use it for improving the performance a lot. However, we have included other gems which are very useful for tracking your load times as well.
Rack Mini Profiler (GITHUB PROJECT)
It is a middleware that displays speed badge for every html page. Designed to work both in production and in development (it is configured in the development environment by default). If you experiment some problems with the caching behaviour you can see this section. On the other hand, it could become annoying, so you can disable it by following these instructions:
- Go to the rack mini profiler initializer located in:
config/initializers/rack_profiler.rb - Comment the initialization line in this file (the only one there is).
You can also configure a lot of settings for this gem, see the redame for more information.
Flamegraph (GITHUB PROJECT)
It is a stack trace visualizer for Ruby 2.0, flamegraph support is built into rack-mini-profiler, just require this gem and you should be good to go. you only need to add ?pp=flamegraph at the end of your query string
Debugging is a pretty important process for developing an application, we have integrated a jazz_hands gem, it is an opinionated set of console-related gems and a bit of glue (having Pry as its core):
- [Pry][pry] for a powerful shell alternative to IRB.
- [Awesome Print][awesome_print] for stylish pretty print.
- [Hirb][hirb] for tabular collection output.
- [Pry Rails][pry-rails] for additional commands (
show-routes,show-models,show-middleware) in the Rails console. - [Pry Doc][pry-doc] to browse Ruby source, including C, directly from the console.
- [Pry Git][pry-git] to teach the console about git. Diffs, blames, and commits on methods and classes, not just files.
- [Pry Remote][pry-remote] to connect remotely to a Pry console.
- [Pry Byebug][pry-byebug] to turn the console into a simple debugger.
- [Pry Stack Explorer][pry-stack_explorer] to navigate the call stack and frames.
- [Coolline][coolline] and [Coderay][coderay] for syntax highlighting as you type. Optional. MRI 2.0.0+ only
You can see how to use Pry here there are amazing tricks and commands that you can utilize for inspecting your code, even make a RDD - REPL Driven Development.
We want to integrate a new way for structuring and generating our stylesheet resources in Rails. For that reason we have designed Sassish, and we will introduce you to it.
Sassish (we are thinking about changing its name, also we are thinking in bundling this piece of code in a gem as well) helps you with how the style files are organized and how these are loaded, its approach is an hybrid combination between both the traditional assets precompile philosophy and the benefits of sass' features.
The main idea is to simplify the development process by improving the organization, reusability and loading of the stylesheet resources, mitigating many issues that we've seen (it will help you for including an OOCSS philosophy in the future).
As you can see in the image below, we have two macro-levels of organization (you can choose only one level if you want), the first level solves the problem for including more than one CSS framework (e.g. Bootstrap vs Foundation) or UI kit (i.e. third party CSS components) by using multiple Rails layouts, in this case we have two segmentations:application and application-welcome.
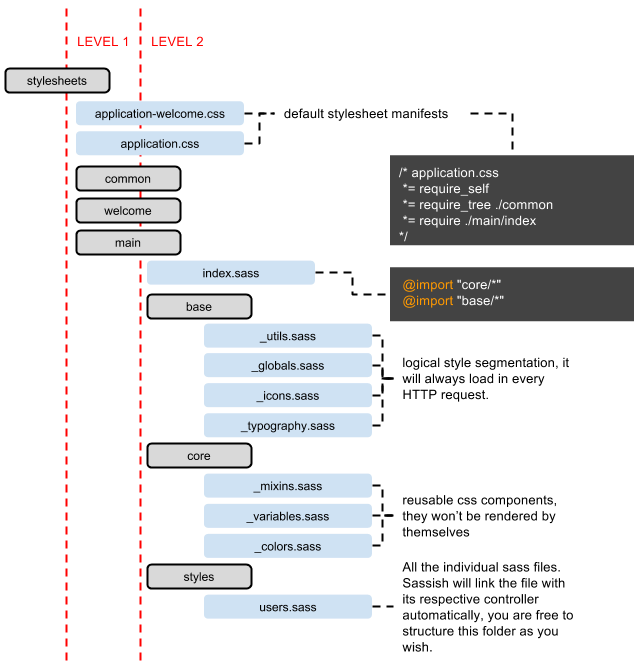
The second level is the most important one, it defines a new structure in which you have two kind of style resource areas, the first one allows you to define your general style (the common style inherited from the specific rails layout, in this case it is the main layout associated with the application.css manifest), all sass files defined here will be loaded in each view associated with the main layout. Take into account that all common rendered CSS should be included in the base folder, on the other hand, the core folder only should be used for reusable components applying a more object oriented philosophy (you can read more info about this here and here).
The styles folder defines an automatic way for loading your stylesheets according to a specific controller. Suppose that you have the following distribution:
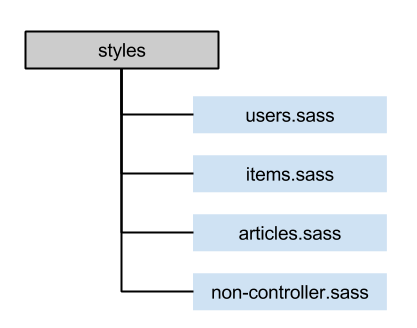
And suppose that you are requesting a view which is linked to the UserController (which uses the main layout), then Sassish will automatically include both base and users.sass style files, it means that all remaining files inside the styles folder won’t be included, which improves performance.
However you can also use a Sassish helper method named add_sassish_style for explicitly including any number of style files that you may want for a specific view. For example:
- add_sassish_style 'main/styles/non-controller', 'any/other/file' # adds non-controller.sass and another file you have lying around only to this view
%h2= t(".sign_in")
= simple_form_for(resource, as: resource_name, url: session_path(resource_name)) do |f|
  .form-inputs
    = f.input :email, label: false, required: false, autofocus: true, placeholder: t(".your_email")
    = f.input :password, label: false, required: false, placeholder: t(".your_password")
    = f.input :remember_me, label: false, inline_label: t(".remember_me"), as: :boolean if devise_mapping.rememberable?
  .form-actions
    = f.button :submit, t(".sign_in"), class: 'btn-block'
.text-right
  %br
  = render "devise/shared/links"
Take into account that in order for the above code to work, you must to include your non-controller.sass file to the assets precompile declaration inside the assets initializer, you can also use the precompiled_stylesheet Sassish generator.
$ rails g precompiled_stylesheet non-controllerIt will add a line to include the non-controller style file to the assets precompile declaration (in config/initializers/assets.rb), but it will use the folder defined for the Sassish styles.
# config/initializers/assets.rb
# Precompile additional assets.
# application.js, application.css, and all non-JS/CSS in app/assets folder are already added.
Rails.application.config.assets.precompile += %w( main/styles/non-controller.css application-welcome.css application-session.css )
You can configure the Sassish folder by using an initializer, this template already includes this
Sassish.setup do |config|
  config.define_stylesheet_path 'main/styles'
end
This piece of code tells Sassish that the ‘app/assets/stylesheets/main/styles’ folder will be used to store all individual CSS style that will be only required using either the specific controller or the add_sassish_style helper.
Also, you do not need to be worried about your generators (assets, scaffold or similar), Sassish modifies the way how the stylesheet files are generated. Any new resources created by a generator will take into account the configured Sassish folder and the assets precompile declaration, so Sassish allows you to manage its approach with ease.
This will generate and put the files and modify the assets precompile configuration as needed by Sassish automatically.
$ rails g scaffold user
$ rails g assets user
Finally, in order to make all this magic work, you need to replace your traditional stylesheet_link_tag and use sassish_stylesheet_link_tag instead, it performs exactly as the traditional helper, but it will automatically include the specific controller style resource (e.g. users.sass) and any other explicitly added styles using the add_sassish_style helper.
!!!
/ app/views/layouts/application.html.haml
%html
  %head
    %meta{:name => "viewport", :content => "width=device-width, initial-scale=1.0"}
    %title= content_for?(:title) ? yield(:title) : 'Rails Foo'
    %meta{:name => "description", :content => "#{content_for?(:description) ? yield(:description) : 'Rails Foo'}"}
    = sassish_stylesheet_link_tag 'application', media: 'all', 'data-turbolinks-track' => true
TODO: We are planning on writing a blog post for explaining Sassish in depth, stay tuned!
We have defined a way how to deal with our Javascript code, first of all, we have included Coffeescript in favor of writing plain Javascript (we still need investigate more about the new features on ES6 - you can find more information here and here), However the main focus of our JS approach is not related with a metalenguage or a specific functionality itself, in fact our approach is pretty simple but it will save you a lot of time in the future.
We propose that you manage your Javascript code using a master JS object which is segmented according to your application domain through small components (as a part of the master object), each component will have a setup method convention for invoking its functionality from whichever place in your rails views (whenever you need it, of course).
This approach allows you to build a cleaner code facilitating its testing and maintainability. Then, you could integrate your own approach for segmenting the plain file itself (the file in which the master object is contained), you can also include something similar to Gon gem for managing how the components are loaded, however, for now, we prefer to leave the JS loading process as it is.
The below code shows the current structure for the main.js.coffee file. We have used RailsFoo (the app's name) as the master object's name, but it can be anything you like) :
# app/assets/javascripts/main.js.coffee
window.RailsFoo =
  welcome:
    setup: ->
      @sayHello()
      return
    sayHello: ->
      console.log 'Hey yourself!'
      return
As you can see, there is a welcome component (i.e. 'namespace') which includes two functions, one of them is the setup initialization function which is in charge of invoke all necessary functions in the welcome application domain, this function should be invoked only in the view in which the component is needed.
-# app/views/welcome/index.haml
.site-wrapper
  .site-wrapper-inner
... rest of the code here...

/ invoking the js welcome component for this specific view
/ note that this is one line of plain javascript to invoke all the rest
:javascript
  RailsFoo.welcome.setup()
Obviously, you are free to build your master JS object as you wish (with all namespaces and segmentation that you need), only keep in mind that your code must be in line with the DRY philosophy. By the way, the namespacing or segmentation that you use is not necessarily "by-controller" (as we did with Sassish), it instead means javascript functionality that you need to put in the page to add a required dynamic behaviour (e.g. you could have a "shoppingCart" namespace).
This template is integrated with the Bootstrap 3 framework. You can find some configuration about the integration in the sprocket manifest files and in the app/assets/stylesheets/bootstrap_and_overrides.css.less file. Also, we have integrated the simple_form gem, and we have changed its wrappers' configuration to be the included bootstrap configuration, you can see this here: config/initializers/simple_form_bootstrap.rb (we left it as the default). If you wish, you can check a gem that may help you with bootstrap generators and templates for you to use twitter-bootstrap-rails. We did not include it, it's up to you.
One of the most important thing in this era is data analysis, you can get those metrics and data by using several existing tools (Google Analytics, Kissmetrics, Piwik, Clicky, Woopra, etc), however you really need to pay attention where you include your scripts, and to not forget about them. By the way, in order to better do stuff with tags, instead of just adding Google Analytics as usual, for example, give a try to Google Tag Manager, which let's you do this dynamically so that you don't need to alter your configuration in the code.
For that reason, we have created a partial folder for including all the scripts you need for monitoring your app (yes, only a partial, there is nothing magical going on here), but bear in mind that in order for the analytics scripts to do their work you must include them in all existent pages in our web application. By the way, you can find this partial in app/views/partials/_analytics_scripts.html.haml.
But even with that, we wanted to avoid including this partial in all our views (because we could forget!), even in all our layouts, for that reason, we have applied an inheritance approach for managing our layouts, we have created a root layout (you can see this located in app/views/layouts/root.html.haml). The main idea is that you use the root layout as a parent for all your new layouts, this way, you can include the common structures (like the analytical scripts) inside the root layout and reuse them in all your child layouts, you can see an example for this implementation in app/views/layouts/application.html.haml and app/views/layouts/welcome.html.haml layouts. The way you should think about "layout inheritance" is that you just reuse as much as you can, so, same as following DRY.
RAILS PANEL (GITHUB REPO)
RailsPanel is a Chrome extension for Rails development that will end your tailing of development.log. It hooks with you Chrome Dev Tools so that you have all information about your Rails app requests. Provides insight to db/rendering/total times, parameter list, rendered views and more.
Although this gem is more useful for Active record than Mongoid it helps you with your logging metrics.
SHOG (GITHUB REPO)
Make your rails 4.0 log details more colorful, we think that readability is one of the most of important things in the development process, this is also the case for logs, we could use RailsPanel or the request-log-analyzer gem (even though this is more related with ´ActiveRecord´) but we could also get a cleaner look at our logs in the console by using Shog! (you can configure it using its initializer located inconfig/initializers/shog.rb). Just do rails server as usual to see how colorful your logs are now.
In the past, we have had some problems with my helpers when my application began to grow, essentially, it is difficult to achieve a helper hierarchy structure with the default Rails helper approach. But we do not want to change the way helpers work in Rails, but at least, to guarantee that there is no place for ambiguities, for that reason we have included the following line config.action_controller.include_all_helpers = false in the config/application.rb file, it will avoid loading all existent helpers on each request (as Rails usually does). At the end only the helper associated with the specific controller and the ApplicationHelper will be loaded (Sassish-style again, but with helpers).
Sometimes we wonder about what would be the best place for our domain logic, we are afraid for having fat controllers, but having fat models are not a solution either. We need to focus in what are the best practices for refactoring or building our code, and you can find excellent posts about this (I like this one). However, I want to focus in the Service Object approach. This approach will help you avoid many problems in the future and will allow you to apply the SRP with ease.
You can also find many online resources (posts, guides, tutorials, screencasts, etc.) about this topic (like this and this), but I like much this post as it exposes a pretty simple way for adopting the service object philosophy. I would like to emphasize the following aspects from it:
- Naming: the service object name is a non-finite verb phrase (wth?-> see here), because it denotes an action which is associated with a single responsability. Semantically it is easier to handle regarding its invocation and portability.
- Invoking: use a public method named call, “Lambdas and Procs also respond to
callso in your tests you have the possibility to mock the service with a simpleLambda, which is quite convenient”. - Structuring & Organization: a folder named services at the same level of the models folder. You can also follow the same namespacing conventions using modules and classes as commonly used in Rails (code reloads too).
- Dependency Injection: having a service with many responsibilities is a signal that you need to split it, but you can always use the dependency injection principle for fully isolating each service object.
We have included many useful gems and tools in order to improve both our development environment and app quality according to our needs and experience, however, you can always disable whatever thing you wish or add more things, this is our starting base and it will continue evolving.
If you want/need to migrate this template to use ActiveRecord instead of MongoID please remember to include the following (these do not support or not apply to be used with MongoID):
- lol_dba
- request-log-analyzer
- rails5 ActiveRecord colored SQL log backport
- annotate_models
Also for newer versions consider adding:
- jazz_fingers
- rack-attack
This template was heaviliy inspired by looking into ALL the categories from Awesome Ruby the last revision for this was on July 2015, preserve its freshness by having a look every now and then (e.g. each time you create an app?) 👍.